
Introduction
Thank you for choosing our Infinity One series steam generator product. Please take the time to read these instructions before you begin as they contain important information about the installation, operation and maintenance requirements for peak efficiency.
The Infinity One residential control series steam generators are available in specifications from 6kW to 24 kW, and are equipped with our Infinity One residential intelligent controller, plus the commercial controller, the steam generator cleaning system (including pump) plus, if included in the package, the aroma oil pump system.
With these, not only you can control the temperature and time duration of your steam bath (both residential and commercial) but also the steam room light and fan if installed. You can easily operate the automatic drain valve, automatic descaling, change the temperature display between Centigrade and Fahrenheit; alter the working mode, as well as displaying the steam generator’s status by the 8 LEDs. Please note also that one “Infinity One residential control” controller can control multiple Infinity One residential steam generators.
Every Infinity One residential control steam generator is thoroughly tested before leaving the factory so there may be some water remaining in the system when delivered.
IMPORTANT
★ Read the manual before installation and operation.
★ This appliance must be connected to an all-pole isolator. This means that there should be a quick way to cut off all power to the generator. The cut-off switch is usually installed next to the generator.
★ This equipment must be installed by licensed electrician and plumber.
★ Disconnect the power supply before exposing the electrical connections.
★ Confirm the correct voltage being supplied to your steam generator, one or three phase. Residential applications are almost always one (single) phase, and commercial locations, three phase.
SAFETY PRECAUTIONS for steam bathing.
★ Elderly persons, pregnant women, or these suffering heart disease, high blood pressure, diabetes or not in good health are advised to seek a medical opinion before using a steam room.
★ Do not smoke in the steam room.
★ Avoid using the steam room immediately after strenuous exercise.
★ Do not use the steam room when under the influence of alcohol.
★ Leave the steam room immediately if you feel sleepy, sick or uncomfortable.
★ Ensure good ventilation through the steam room.
★ We do not recommend this product is used by children under sixteen years of age.
★ Commercial operators should post a notice of these precautions in a prominent position.
Specifications
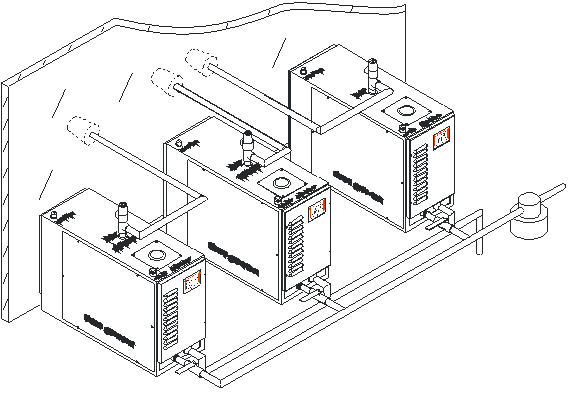
If greater power is required than a single generator can deliver, one Infinity One residential control may be used to control two or more steam generators. For example, if you need a 24kW steam generator you can use one Infinity One residential control to control two 12kW steam generators. The key advantage is that if a problem develops with one generator, the other will supply steam until the problem is resolved.
Product component description
| No. | Part | description |
| 1 | Push to operate | |
| 2 | Push to operate | |
| 3 | Dual function button push to select steam on demand mode or to drain the generator manually when not steaming. | |
| 4 | Dual function button used when steaming to set the time/temperature and when not steaming, to begin the automatic descaling | |
| 5 | Increase button | |
| 6 | Decrease button | |
| 7 | Dual function button switches a fan on and off also used to confirm changes in temperature settings. | |
| 8 | Time display window | Display the resting and operating time of the steam generator |
| 9 | Temp display window | Display the detected temperature of steam room |
| 10 | Light LED | Indicator LED for the lamp of steam room. It is the on/off with the on/off steam room lamp control |
| 11 | Water LED | Indicator LED for water level. Red means water is filling. green means water level has been reached control point. Note, if the LED always red (exceeding 5 minutes) check water supply and if water level valve is blocked, otherwise the water level inlet valve may be broken . |
| 12 | Drain LED | Indicator LED for draining – shows red for manual draining and green for automatic draining at the end of the cycle. |
| 13 | Mode LED | Shows red for steam on demand mode and green for conventional timing. |
| 14 | Heating LED | Green indicates heating is on, red indicates the required temperature has been reached and the heating has stopped |
| 15 | Overheat LED | Indicator LED for over heat, red means the steam generator was cut off as the heat element is too hot (lack of water, the heating elements may not be in water, but in air) |
| 16 | Fan LED | Indicator LED for Fan the lamp of steam room. |
| 17 | Clean LED | Indicator LED shows descaling in operation. |
Please note that for the generator to operate in steam-on-demand mode, the steam-on-demand button must be connected.
| No. | Part | Description |
| 1 | Push to operate. | |
| 2 | Push to light on or off. |
|
| 3 | Dual function button push to select steam-on-demand mode or to drain the generator manually after use. |
|
| 4 | Dual function button used when steaming to set the time/temperature and when not steaming, to begin the automatic descaling. | |
| 5 | Increase button. | |
| 6 | Decrease button. | |
| 7 | Dual function button switches a fan on and off and also used to confirm changes in temperature settings. | |
| 8 | Time display window | Displays the resting and operating time of the steam generator. |
| 9 | Temperature display window | Displays the detected temperature of steam room. |
| 10 | Light LED | Indicator LED for the steam room lamp. It switches on when light is in use. |
| 11 | Water LED | Indicator LED for water level Red means water is filling, green means water level at correct level. If the LED always stays red for more than five minutes, check the water supply and if water level valve is blocked. If correct the water level inlet valve is broken. |
| 12 | Drain LED | Indicator LED for draining – shows red for manual draining and green for automatic draining at the end of the steam cycle. |
| 13 | Mode LED | Shows red is for steam-on-demand mode and green for conventional timing. |
| 14 | Heating LED | Green indicates heating is on; red indicates the desired temperature has been reached and the heating has paused. |
| 15 | Overheat LED | Indicator LED for over-heat. Red means the steam generator was cut-off as the heating elements are too hot because of insufficient water so the heating element(s) are in air and not water. |
| 16 | Fan LED | Indicator for fan LED for fan. |
| 17 | Clean LED | Indicator LED shows descaling in process. |
Steam on demand switch (SOD)
The steam-on-demand button can be located inside or outside of the steam room and connected to the controller. When the button is pushed the LED indicator inside the switch shows red and steam will be generated for 30 minutes. After 30 minutes or if the button is pressed again, the light will go out and steam production will stop.
Commercial mode instructions (Infinity One residential control+SOD)
Installation
★ Isolate the power supply before installation.
★ Confirm the model you have selected is suitable for your steam room.
★ Mount the steam inlet nozzle approximately 12 inches above the floor, and it should be at least 18 inches from person’s body/feet to avoid risk of burns from direct contact with steam.
★ If the steam generator is installed in an inaccessible place ensure that both the electrical power and water supply can be isolated (shut off) in an emergency.
★ The minimum water inlet pressure is 3.6 pounds per square inch and the maximum is 20 pounds per square inch. We recommend that the water pressure not to exceed 15 pounds per square inch.
★ The steam pipe from the steam generator to steam room should be kept to a minimum, pipes longer than 15 feet should be insulated to prevent heat loss. Steam pipes will be hot during use and must be protected against accidental contact with surrounding (especially flammable) objects.
★ Keep the number of right angle bends to a minimum and ensure that the pipe run does not create a trap into which condensate would gather and cause a blockage. The pipe must not go down and then up forming a U or V shape.
★ There must be no valve or other blockage in the steam pipe.
★ The steam pipe should be metal (copper) or a material which can withstand 300° F temperature We recommend a copper pipe.
★ It is not recommended that you install the steam generator outdoors or where it might be affected by frost or get wet. Allow for a minimum space of 20 cubic feet where the generator is installed.
★ The steam generator should be level side to side and front to back and should be installed so that the arrows on the case point up.
★ Do not install the steam generator in close proximity to hazardous substances.
Installation
The steam generator should be installed in dry, well ventilated place in close proximity to the steam room. It can be placed on the floor or hung on a wall.
To hang the generator on a wall, drill 3 8mm diameter holes. Install the top two screws in place first and then hang the generator by the 2 keyhole shaped holes in the back plate. With the front cover removed, install the 3rd screw to secure the unit in place.
Water and steam connection
The water supply pipe and steam pipe should comply with local standards.
Connect the water inlet valve of the generator to the water supply using a flexible hose with 1/2 inch fittings.
Steam outlet (1/2 inch or 3/4 inch) use the same dimension (1/2″ or 3/4″) copper pipe, if the steam pipe is longer than 15 feet, the pipe should be insulated. During use, the steam pipe will become very hot and must be protected against accidental contact.
Note that according to the location it may be necessary to attach an additional length of pipe to the pressure relief valve in order to divert the steam flow in a safe direction should the valve operate.
Connect the drain outlet to a suitable drain via a copper pipe with the appropriate fittings.
Make a secure connection between steam nozzle and steam pipe. Use a non-corrosive hose with ½ inch unions to connect between the descaling liquid container and the inlet valve. Note that the descaling liquid container must be mounted at least two feet above the steam generator as a gravity feed, if a pump is not used.
Installation of controller and temperature probe
Both the Infinity One residential and commercial controllers are water resistant and can be installed inside or outside the steam room according your preference.
Ideally the control panel should be installed at a height of approximately four feet from the floor for ease of use.
To install, drill an approximately 1.6″ wide hole in the wall. Open the front cover of steam generator and attach the control cable (6 connectors) and temperature sensor cable (2 connectors) to the relevant ports. Push the back of the controller in the hole and press close to the wall; then use a water resistant adhesive to hold the controller in place and relocate the cover.
Control panel installation: Connect one end of cable to circuit board port on main circuit board in steam generator and connect the other end to the controller’s cable.
Temperature probe installation: The temperature probe is installed inside the steam room at approximately 5 to 6 feet from the floor and away from the door. Use a 4mm screw to hold it in place and then connect to the wire from the controller.
Installation for power supply and control cable: Confirm the correct voltage of power supply and wire gauge. Use a single appropriate gauge (drop) cable from the circuit breaker box to the steam generator, making sure that the wire gauge is correct for the generator’s kilowatt rating.
Remove the knock out plate for the power cable entry, and use a rubber grommet to protect the cable. Connect the wires to the conductors to the correct terminals. For single phase power supply, use the copper bridge connectors; for a three phase supply remove the copper bridge connectors.
Remove the knock out plate for the control cable entry, and use a rubber grommet to protect the cable. Connect the cable to the relevant port on the main circuit board.
Ensure the power supply wire and control cable remains separated to prevent the power supply cable magnetic field from disturbing the control cable signal.
Steam-on-Demand Function (SOD)
Commercial operators may wish to take advantage of the steam-on-demand function which will allow customers to press the steam-on-demand button located inside the steam room, after which the generator will operate for 30 minutes then stop until activated again. If the SOD is pressed again, the 30 minute steam supply will stop.
To operate the steam-on-demand function, install the commercial controller inside the room where the generator is installed and connect the push button supplied in a convenient location inside the steam room and connect to the controller with the provided cable.
Testing and operation
Once the installation has been completed and checked, switch on power and water supply and conduct this test –
On the control panel press the “![]() ” key, (the key has a time-lapse function, press it for 1 second), the time and temp windows display the data.
” key, (the key has a time-lapse function, press it for 1 second), the time and temp windows display the data.
The water inlet valve opens and water enters the boiler. The indicator LED should be red. When the water level rises to the low water sensor level the heating element (s) switch on and the heating indicator LED illuminates. Several seconds later when the high water sensor is reached, the water inlet indicator LED changes to green and the water inlet valve will turn off.
After a few minutes of operation it will begin steaming, for small steam generator 2-3 minutes, for larger generators 3-5 minutes.
Press the “![]() ” key again on the controller to turns the system off. The generator will stop producing steam.
” key again on the controller to turns the system off. The generator will stop producing steam.
Press the “![]() ” key again and after a few seconds the generator will begin steaming again. Let the generator operate for a while so that the water level will fall to the low water mark. The water inlet valve will open automatically and the water inlet indicator LED will turn red. While the cold water enters boiler, the steam generator will still produce steam. Once the high water level is reached again the water inlet valve will close and the LED will display green .
” key again and after a few seconds the generator will begin steaming again. Let the generator operate for a while so that the water level will fall to the low water mark. The water inlet valve will open automatically and the water inlet indicator LED will turn red. While the cold water enters boiler, the steam generator will still produce steam. Once the high water level is reached again the water inlet valve will close and the LED will display green .
The time display will count down to show the remaining time; when it reaches zero the steam generator will switch off.
Once the steam generator has operated for ten minutes or more, when it is turned off (manually or automatically) it will enter the automatic drain down cycle. This means that once the temperature of the water in the boiler temperature falls below 1750 F it will drain and then flush clean before it can start to generate steam again. If the drain pipe is installed so that it drains into the shower, be very careful as this water will be very hot.
Note when the steam generator is off you can drain it manually (flush boiler and drain) by pressing the “drain” button. The drain LED will start flashing. Note that the water will only start draining once the temperature has fallen below 1750 F.
The “![]() ” button has two functions. If the generator is off this button can be used to drain the generator manually. If the generator is switched on it is used to select the steam-on-demand operating mode.
” button has two functions. If the generator is off this button can be used to drain the generator manually. If the generator is switched on it is used to select the steam-on-demand operating mode.
When the preset temperature for the steam room is reached two of the three element banks will switch off allowing just the one bank to continue heating and maintain the room temperature. Elements will cycle on and off to maintain the temperature to within approximately a few degrees above or below the preset level. We suggest an initial temperature of no more than 1050 F and to adjust from there based on personal preference.
Boil dry protection. If the water supply fails the water level indicator LED will change to red and the steam generator will stop.
The “ ![]() ” can output AC230V to power the transformer for a 12V for steam room light, press on/off.
” can output AC230V to power the transformer for a 12V for steam room light, press on/off.
The “![]() ” button has two functions. It can be used to power a fan if fitted and is also used during the temperature or time setting procedure to confirm the settings. We do not recommend a fan but suggest leaving the steam room door open after use, after the room cools down so that the room fully dries and avoids mold formation by having a damp room for an extended period.
” button has two functions. It can be used to power a fan if fitted and is also used during the temperature or time setting procedure to confirm the settings. We do not recommend a fan but suggest leaving the steam room door open after use, after the room cools down so that the room fully dries and avoids mold formation by having a damp room for an extended period.
The “![]() ” button has two functions. It is used to set the time and temperature settings, and to start the descaling operation.
” button has two functions. It is used to set the time and temperature settings, and to start the descaling operation.
To change the display temperature from Fahrenheit (default) to Celsius, change the jumper settings of the JP1 pins on the circuit board. Please refer last chapter circuit diagram.
Setting time and temperature
When the steam generator leaves the factory the default settings are 1040 F and sixty minutes steam duration. They can be changed by following these directions –
Time setting. Press “![]() ” key so that the time display window will flash – press the up and down arrows “
” key so that the time display window will flash – press the up and down arrows “![]() ” , “
” , “![]() ” to adjust the time. Every press the time will increase or reduce 5 minutes and when the desired setting is reached press “
” to adjust the time. Every press the time will increase or reduce 5 minutes and when the desired setting is reached press “![]() ” and the display will stop flashing. You can adjust from the time from 10 to 240 minutes. If you exceed 240 minutes, it will display “Long” meaning that the generator will run until manually stopped. Note the controller has a memory function so as long as power is supplied to the generator it will keep your settings. By “supplied” it means that although the generator is off, the ~240 volts power supplied to the generator is still on. If you switch off the power from the cutoff or circuit breaker, the control will be reset to the defaults.
” and the display will stop flashing. You can adjust from the time from 10 to 240 minutes. If you exceed 240 minutes, it will display “Long” meaning that the generator will run until manually stopped. Note the controller has a memory function so as long as power is supplied to the generator it will keep your settings. By “supplied” it means that although the generator is off, the ~240 volts power supplied to the generator is still on. If you switch off the power from the cutoff or circuit breaker, the control will be reset to the defaults.
Temperature setting: If you press “![]() ” once after you finish setting the time or otherwise twice, the temperature window will flash. You can enter the required temperature by pressing “
” once after you finish setting the time or otherwise twice, the temperature window will flash. You can enter the required temperature by pressing “![]() ” “
” “![]() ” to adjust the preferred temperature. Every press will increase or reduce the temperature. You can adjust the temperature from 85-140℉ and once the required temperature has been set press “
” to adjust the preferred temperature. Every press will increase or reduce the temperature. You can adjust the temperature from 85-140℉ and once the required temperature has been set press “![]() ” key the window will stop flashing.
” key the window will stop flashing.
Auto-descaling will only operate when the steam generator is in OFF mode. For example, when the boiler has finished generating steam, the water has drained/flushed and the drain LED is off.
Before auto-descaling can commence, a supply of dilute citric acid liquid must be connected from a storage vessel positioned at least two feet above the steam generator, unless the supplied cleaning pump is used. If so, the liquid can be at the same level or below. For the dilution ratio please refer to the information supplied with the citric acid.
IMPORTANT Do not use strong acids or high concentrations as these may attack and destroy the heating elements or other metal parts of the stainless steel boiler.
To start the process press the “” key for 5 seconds, “Clean” LED will display and the time window will display the previous setting time, default is 8 hours. Press “” or “” for 5 seconds so the time window will display hours. Increase or decrease to set the required time, each button press will increase or decrease 1 hour, maximum 24 hours, minimum is 1 hour.
Once the setting has finished the flashing will stop and the descaling process will begin automatically by opening the inlet valve to fill the boiler with the descaling solution. The inlet valve will close and the solution will remain inside the boiler for the preset time during the cleaning process. At the end of the sequence, the drain valve will open and the boiler will drain and then flush with clean water. When the cycle is complete the drain LED will go off.
Important notes –
Ensure there is sufficient descaling solution in the container to completely fill the boiler – when liquid level reached requested point, the D4 LED on circuit board will be on
If during the descaling, the power supply is interrupted do not operate the steam generator until either the descaling process has been reset or the acid solution has been drained and the boiler flushed with clean water – a minimum of 3 flushes.
Troubleshooting guide
Please note that we recommend all repairs are carried out by a suitably qualified person.
| Trouble description | Cause | Solution |
| When the generator is turned on there is no display on control panel. | Something is wrong with the … | |
| Power supply | Check power supply voltage indicator. LED of power supply on circuit board isn’t on in red then check transformer | |
| Transformer | If the LED is red, remove controller. Use circuit board to turn on steam generator. If steam generator doesn’t work, then circuit board is damaged, so replace circuit board | |
| Main circuit board | ||
| Controller | If the circuit board correctly controls unit so that the generator work normally, check the control cable port and controller connections | |
| Control cable or port | ||
| Turn on steam generator, press “on/off”. If the controller is on, indicator LED of heating isn’t on but there is no steam generator | Something wrong with… | |
| Water supply valve isn’t turned on | If indicator LED for water level is red, check water supply at the water inlet valve. Check the connection of the water level probe | |
| Water inlet magnetic valve | Check earth wire connection of circuit board and boiler | |
| Water level probe | If the indicator LED for water level is green, check circuit board | |
| Main board | Check to find if overheat switch is disconnected | |
| Earth wire of boiler and circuit board | Check elements | |
| Steam generator is turned on control panel is normal, indicator LED for heating is on, but there isn’t any steam | Something wrong with… | |
| Change heating elements | ||
| Heating elements |
If the temperature window displays “LC” the water level probe connection is faulty. Check connection or change water level probe.
If the temperature window displays “HC” the water level probe has short-circuited, so check the water level probe connection and the controller if it has short circuited.
If the steam generator is switched off and water flows out from steam nozzle there is a water inlet valve failure, so check water inlet valve, clean or replace it.
If you cut off the power supply, and water flows out from steam nozzle then the water inlet valve is stuck open you will need to change the circuit board or water inlet valve.
If you turn off the steam generator but it continues to work, the system is defective so you should cut off the power to the generator. It may be the main circuit board, controller, relays for accessories or the water level probe that is causing the problem.
Maintenance
The single biggest problem with steam generation is the buildup of scale, resulting from dissolved solids within the water. Scaling can cause the elements to fail, the water level sensors not to function, premature failure of the O rings resulting in leaks from around the elements. The extent of the problem will vary according to the degree of hardness in the local water supply.
For all commercial operators, we recommend the use of a water softener.
All users commercial and domestic must ensure a regular maintenance routine to descale the generator the frequency of this will vary according to the degree of hardness in the local water supply and the amount of time the generator is used for. Check your the water for hardness and arrange the descaling routine accordingly
High levels of hardness descale once every 50 to 100 hours of operation.
Medium levels of hardness descale once every 100 to 250 hours operation.
Low levels of hardness descale once every 250 to 1000 hours of operation.
To descale the generator use a solution of weak acid crystals (such as citric acid) mixed with water. Citric acid crystals are available in sachets for descaling kettles from most hardware stores, commercial operators in hard water areas my wish to purchase larger quantities from specialist outlets. Follow the instruction supplied with the crystals and allow sufficient time for the solution to dissolve the scale before flushing out the generator.
Faults arising from a result of a failure to descale the generator are not covered by warranty.
Because heating and cooling cause expansion and contraction, it is important to inspect all the water and steam inlets and outlets as well as their pipes and connectors on a regular basis to ensure there are no leaks.
Clean the filter net in the magnetic valve according to the water quality in the location.
The condition of the wiring and electrical integrity of the generator should be checked regularly – for commercial operators this should be at least once a year.
Warranty
All generators are guaranteed for 12 months from the date of purchase. This guarantee excludes consumable items such as the electrical elements and failures resulting from misuse or abuse such as a failure to descale as described above.